HomeLab Setup
As I kickstart my home lab journey, the first issue I face — or rather, the first issue I don’t have — is owning my own ISP router. But that’s not going to stop me from building one. The only real problem is double NAT, but I’ve decided to ignore it as a minor hiccup for now, even though I know it will likely become a major roadblock down the line. Still, I have to start somewhere and deal with the problems as they come. Let’s begin this home lab journey!
Physical Connection
- Connect Ethernet cable from Ubuntu’s port → Router’s WAN port.
- Router’s other Ethernet port (LAN)→ unmanaged switch.
- Switch → Proxmox VE (and other LAN devices).
1. On my Linux Machine
This is the device status on my main Ubuntu machine.
1
2
3
4
5
6
7
butcher@butcher:~$ nmcli device status
DEVICE           TYPE      STATE                   CONNECTION
enp2s0f1         ethernet  connected               Wired connection 3
wlx1cbfce718a5d  wifi      connected               MacSheen
lo               loopback  connected (externally)  lo
eno1             ethernet  unavailable             --
enp2s0f0         ethernet  unavailable             --
Just to provide context, I am using my landlord’s wifi on my main desktop. It is connected to wi-fi using one of those 802.11n adaptor (wi-fi adaptor). eno1 is the inbuilt ethernet port. ensp2s0f0 and enp2s0f1 are from my Broadcom dual ethernet port PCIe network card.
1
2
3
# Looks like these are 1Gbe ports
butcher@butcher:~$ sudo ethtool enp2s0f1 | grep -i speed
	Speed: 1000Mb/s
Port enp2s0f1 will be my WAN input for router. For this to happen I have to enable Shared to other computers feature from my network setting.
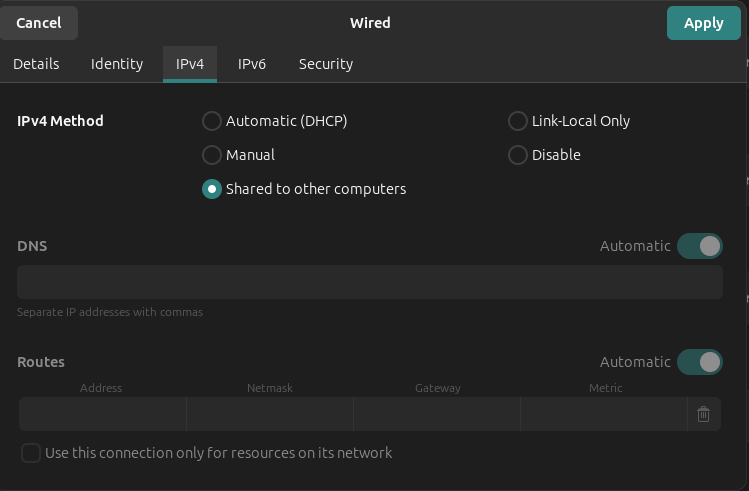
Why it has to be enabled?
It turns the ethernet port into a simple NAT gateway and DHCP server. This provides the necessary ‘uplink’ for my OPNsense router’s WAN interface.
- Assigns a static IP to port
enp2s0f1: 10.42.0.1/24- Starts a DHCP server (using dnsmasq) on that port -> automatically assigns an IP (e.g., 10.42.0.x), gateway (10.42.0.1), and DNS to whatever is connected
- Enable IP forwarding -> allows packets to pass between interfaces
- Sets up NAT (masquerading) via iptables
This is the port status when OPNsense is running.
1
2
3
4
5
6
7
8
butcher@butcher:~$ nmcli -o
enp2s0f1: connected to Wired connection 3
        "Broadcom and subsidiaries NetXtreme BCM5720"
        ethernet (tg3), 00:0A:F7:3E:A3:D9, hw, mtu 1500
        inet4 10.42.0.1/24
        route4 10.42.0.0/24 metric 100
        inet6 fe80::32b3:71da:383a:add8/64
        route6 fe80::/64 metric 1024
We can overwrite the default IP address set by the Ubuntu.
1
2
3
4
5
6
7
8
nmcli connection show

# For me "SharedEthernet" will be enp2s0f1
sudo nmcli connection modify "SharedEthernet" +ipv4.addresses 192.168.50.1/24
sudo nmcli connection down "SharedEthernet"
sudo nmcli connection up "SharedEthernet"

ip addr show <your-ethernet-interface>
I am keeping the default gateway for now. I later plan to connect my Cisco Catalyst 2960 switch in my homelab and play around with IPs and VLANs. For now, the LAN link from my OPNsense is connected to an 8-port unmanaged switch.
2. On my router
Initially my plan was to go with the pfsense but after scouring through post after post in Reddit, OPNsense seems compelling. Not sure why Reddit is villainizing pfsense. I plan to use pfsense later sometime during my homelab journey. I guess I will find it myself.
The installation process is well documented here. During the setup, I said no to LAGG and VLAN setup. I plan to visit them later. I would suggest future me to set it up immediately.
The DHCP IP assigned to the router was 10.42.0.213/24. I changed it to static IP later after getting ssh access.
First, lets ssh into the router. It seems I have to enable it first from web console. It is under System > Settings > Administration option.

Also on my ubuntu machine.
1
2
3
4
5
sudo apt update
sudo apt install openssh-server
sudo systemctl enable ssh   # auto-start on boot
sudo systemctl start ssh    # start now
sudo systemctl status ssh   # should show "active (running)"
1
2
3
4
5
6
7
8
9
10
11
12
13
14
15
16
17
18
19
20
21
# status

butcher@butcher:~$ sudo systemctl status ssh
● ssh.service - OpenBSD Secure Shell server
     Loaded: loaded (/usr/lib/systemd/system/ssh.service; enabled; preset: enabled)
     Active: active (running) since Wed 2025-12-24 22:29:49 EST; 9s ago
TriggeredBy: ● ssh.socket
       Docs: man:sshd(8)
             man:sshd_config(5)
    Process: 104737 ExecStartPre=/usr/sbin/sshd -t (code=exited, status=0/SUCCESS)
   Main PID: 104739 (sshd)
      Tasks: 1 (limit: 9183)
     Memory: 1.2M (peak: 1.5M)
        CPU: 19ms
     CGroup: /system.slice/ssh.service
             └─104739 "sshd: /usr/sbin/sshd -D [listener] 0 of 10-100 startups"

Dec 24 22:29:49 butcher systemd[1]: Starting ssh.service - OpenBSD Secure Shell server...
Dec 24 22:29:49 butcher sshd[104739]: Server listening on 0.0.0.0 port 22.
Dec 24 22:29:49 butcher sshd[104739]: Server listening on :: port 22.
Dec 24 22:29:49 butcher systemd[1]: Started ssh.service - OpenBSD Secure Shell server.
Root login via SSH is disabled by Default in Ubuntu. We will have to enable it.
1
2
3
4
5
6
7
8
9
10
11
sudo nano /etc/ssh/sshd_config

# Find the line:
#PermitRootLogin prohibit-password
#PasswordAuthentication yes

# Change it to
PermitRootLogin yes
PasswordAuthentication yes

sudo systemctl restart ssh
Security note:
Allowing root login with password is convenient for testing but risky long-term. After you finish setup, consider switching to key-based authentication only and disabling password login (PermitRootLogin prohibit-password again, after adding your key).
Now lets update firewall to enable port 22.
1
2
3
4
5
6
7
8
9
10
sudo apt update
sudo apt install iptables

sudo ufw status

sudo ufw allow ssh
sudo ufw reload

sudo iptables -L -n -v | grep 22
1
2
3
4
5
6
# Output

butcher@butcher:~$ sudo ss -tuln | grep :22
udp   UNCONN 0      0      [fe80::c7bc:3118:ccc0:2219]%wlx1cbfce718a5d:546           [::]:*
tcp   LISTEN 0      4096                                       0.0.0.0:22         0.0.0.0:*
tcp   LISTEN 0      4096                                          [::]:22            [::]:*
lets test SSH login locally on Ubuntu
1
2
3
4
5
6
7
8
9
10
11
12
ssh root@localhost

# Output
The authenticity of host 'localhost (127.0.0.1)' can't be established.
ED25519 key fingerprint is SHA256:XXXXXXXXXXXXXX
This key is not known by any other names.
Are you sure you want to continue connecting (yes/no/[fingerprint])? y
Please type 'yes', 'no' or the fingerprint: yes
Warning: Permanently added 'localhost' (ED25519) to the list of known hosts.
root@localhost's password:

root@butcher:~#
Now lets try from OPNsense router first
1
2
3
4
5
6
7
8
9
10
11
12
13
14
15
16
17
18
19
root@OPNsense:~ # ssh root@10.42.0.1
root@10.42.0.1's password:
Welcome to Ubuntu 24.04.3 LTS (GNU/Linux 6.8.0-90-generic x86_64)

 * Documentation:  https://help.ubuntu.com
 * Management:     https://landscape.canonical.com
 * Support:        https://ubuntu.com/pro

Expanded Security Maintenance for Applications is enabled.

47 updates can be applied immediately.
To see these additional updates run: apt list --upgradable

Last login: Wed Dec 24 22:54:30 2025 from 127.0.0.1
root@butcher:~#
root@butcher:~# exit
logout
Connection to 10.42.0.1 closed.
Success!!!
Now from Ubuntu to OPNsense
1
2
3
4
5
6
7
8
9
10
11
12
13
14
15
16
17
18
19
20
21
22
23
24
25
26
27
28
29
30
31
32
# After enabling ssh

butcher@butcher:~$ ssh root@10.42.0.213
(root@10.42.0.213) Password:
------------------------------------------------
|       Hello, this is OPNsense 25.7           |           :::::::.
|                                              |           :::::::::.
|  Website:     https://opnsense.org/          |        :::        :::
|  Handbook:    https://docs.opnsense.org/     |        :::        :::
|  Forums:      https://forum.opnsense.org/    |        :::        :::
|  Code:        https://github.com/opnsense    |         `:::::::::
|  Reddit:      https://reddit.com/r/opnsense  |           `:::::::
------------------------------------------------

*** OPNsense.internal: OPNsense 25.7 (amd64) ***

 WAN (em0)       -> v4: 10.42.0.213/24

 HTTPS: sha256 XXXXXXXXXXXXXXXXXXXXXXXXXXXXXXXXXXXXXXXXXXX
 SSH:   SHA256 XXXXXXXXXXXXXXXXXXXXXXXXXXXXXXXXXXXXXXXXXXX (ECDSA)
 SSH:   SHA256 XXXXXXXXXXXXXXXXXXXXXXXXXXXXXXXXXXXXXXXXXXX (ED25519)
 SSH:   SHA256 XXXXXXXXXXXXXXXXXXXXXXXXXXXXXXXXXXXXXXXXXXX (RSA)

  0) Logout                              7) Ping host
  1) Assign interfaces                   8) Shell
  2) Set interface IP address            9) pfTop
  3) Reset the root password            10) Firewall log
  4) Reset to factory defaults          11) Reload all services
  5) Power off system                   12) Update from console
  6) Reboot system                      13) Restore a backup

Enter an option:
Up until now the IP address of OPNsense is 10.42.0.213. To setup static IP address for router, go to option 2 Set up interface IP address.
1
2
3
4
5
6
7
8
9
10
11
12
13
14
15
16
17
18
Enter an option: 2

Available interfaces:

1 - InternalLAN (ue0 - static) # It was setup later from web GUI : 192.168.100.1
2 - WAN (em0 - static) # This was setup from OPNsense console

Enter the number of the interface to configure: em0

# What I setup:
- IP Address : 10.42.0.10/24
- Gateway: 10.42.0.1
- Do you want to use the gateway as he IPv4 name server too? -YES
- DHCP enable on WAN: No
# It is already enabled by Ubuntu and assigned 10.42.0.1 to our WAN uplink for router
- Do you want to change the gui protocol fro https to http? yes
# I later changed it to HTTPS from System → Settings → Administration
-Do you want to restore web GUI defaults? Yes
One thing I should have considered is - when I set up the IP address for Proxmox, I lost OPNsense web console connection from my Ubuntu machine. I should have known that after setting up LAN, my WAN uplink coming from Ubuntu machine is considered as outside network and OPNsense by default disables all such connections.
At this point SSH was also not working so I had to setup monitor and keyboard for direct console access to my router.
1
2
3
4
5
6
# On OPNsense router
pfctl -d
# This command disables the packet filter completely
# Don't forget to enable it later using
pfctl -e
# I have seen it auto enables as well after a while
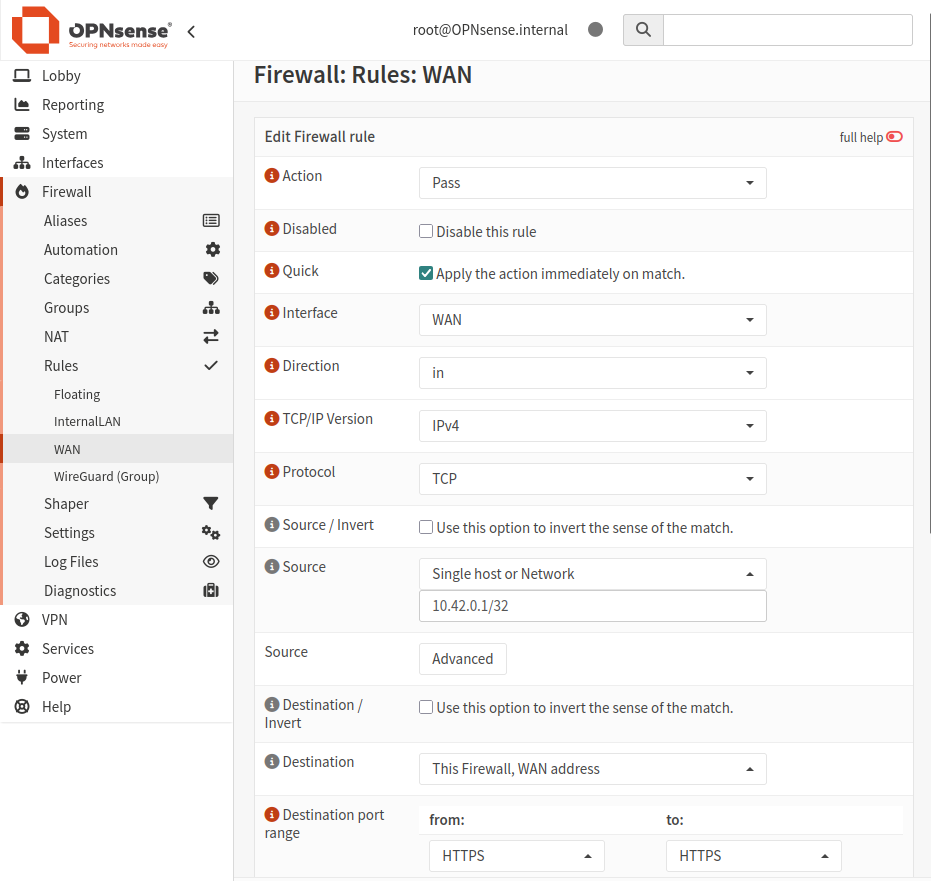
After that, I tried the web console again and I was able to get in. I set up Firewall rule to allow TCP protocol from single host (my ubuntu machine) as a long term alternative.
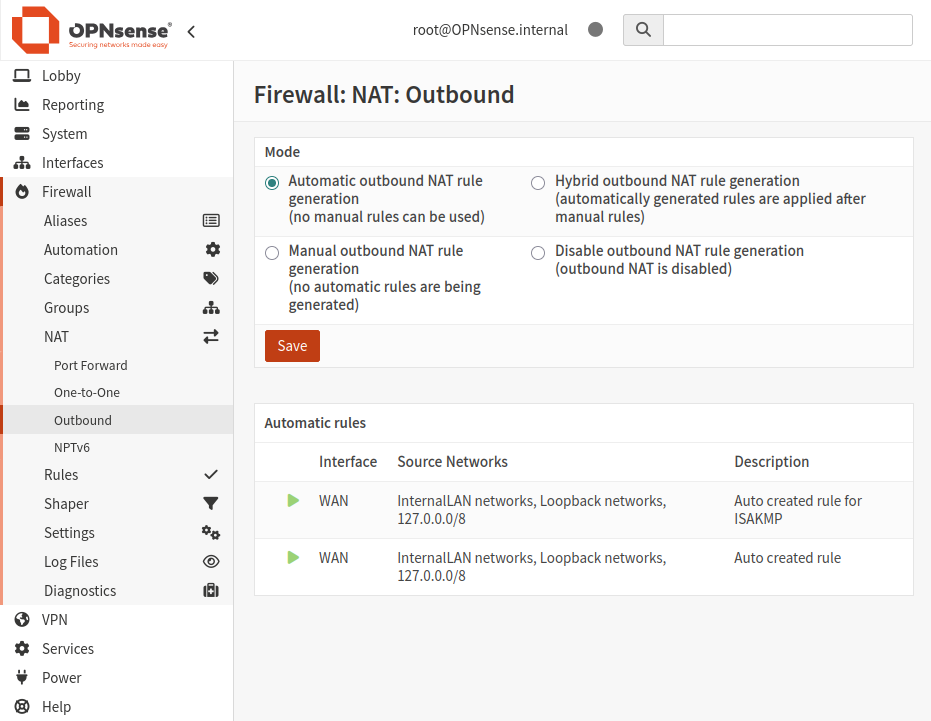
Also we have to enable the Automatic Outbound NAT for our PVE to have internet access. OPNsense will automatically create NAT rules for all LAN subnets to masquerade behind the WAP IP (10.42.0.10).
As this is my first time using OPNsense, I threw in some Firewall rule for LAN as well. Later I plan to visit the OPNsense features in depth but for now, I want my PVE to be up and running.

Also I checked the SSH connection. Here is how it looks like after I setup static WAN IP address.
1
2
3
4
5
6
7
8
9
10
11
12
13
14
15
16
17
18
19
20
21
22
23
24
25
26
27
28
29
30
31
32
butcher@butcher:~$ ssh root@10.42.0.10
(root@10.42.0.10) Password:
Last login: Thu Dec 25 22:47:33 2025 from 10.42.0.1
------------------------------------------------
|       Hello, this is OPNsense 25.7           |           :::::::.
|                                              |           :::::::::.
|  Website:     https://opnsense.org/          |        :::        :::
|  Handbook:    https://docs.opnsense.org/     |        :::        :::
|  Forums:      https://forum.opnsense.org/    |        :::        :::
|  Code:        https://github.com/opnsense    |         `:::::::::
|  Reddit:      https://reddit.com/r/opnsense  |           `:::::::
------------------------------------------------

*** OPNsense.internal: OPNsense 25.7 (amd64) ***

 InternalLAN (ue0) -> v4: 192.168.100.1/24
 WAN (em0)       -> v4: 10.42.0.10/24

 HTTPS: sha256 XXXXXXXXXXXXXXXXXXXXXXXXXXXXXXXXXXXXXXXXXXX
 SSH:   SHA256 XXXXXXXXXXXXXXXXXXXXXXXXXXXXXXXXXXXXXXXXXXX (ECDSA)
 SSH:   SHA256 XXXXXXXXXXXXXXXXXXXXXXXXXXXXXXXXXXXXXXXXXXX (ED25519)
 SSH:   SHA256 XXXXXXXXXXXXXXXXXXXXXXXXXXXXXXXXXXXXXXXXXXX (RSA)

  0) Logout                              7) Ping host
  1) Assign interfaces                   8) Shell
  2) Set interface IP address            9) pfTop
  3) Reset the root password            10) Firewall log
  4) Reset to factory defaults          11) Reload all services
  5) Power off system                   12) Update from console
  6) Reboot system                      13) Restore a backup

Enter an option:
3. Setting Up WireGuard
Now I want to setup WireGuard VPN tunnel so I can access the PVE console from my main machine. WireGurad and VPN tunnel in general demands a separate blog, which is in my roadmap.
From GUI > VPN > WireGuard
- Instances > Add > Create a new instance
- Name: AccesPVEfromUbuntu
- Public Key: XXXXXXXXXXXXXX (OPNsense WireGuard server’s public key)
- Private Key : XXXXXXXXXXXXX (OPNsense WireGuard server’s private key)
- Listen port : 51820
- Tunnel Address : 10.200.0.1/24
- Peer : UbuntuClient
- Peers > Add peer for Ubuntu
- Generate Keys
- Allowed IPs (full LAN) + a tunnel IP for Ubuntu
- Name: UbuntuClient
- Public Key : XXXXXXXXXXX (Generated on Ubuntu, pasted here so OPNsense knows the client)
- Pre-shared Key : Optional ( It adds an extra layer of security on top of the public/private key pair)
- Allowed IPs : 10.200.0.2/32
- Endpoint Address: IP address of PVE
- Endpoint port: 51820
- Instances :AccessPVEfromUbuntu
- Keepalive internal : 25
On the Ubuntu side
- Install wireguard
1
 sudo apt install wireguard
- Generate Keys
1
  wg genkey | tee server_private.key | wg pubkey > server_public.key
- Create /etc/wireguard/wg0.conf
1
2
3
4
5
6
7
8
9
10
11
  [Interface]
  PrivateKey = <server_private.key content> # ubuntu's private key
  Address = 10.200.0.1/24
  ListenPort = 51820

  [Peer]
  PublicKey = <OPNsense client public key>
  PresharedKey = <OPNsense preshared key>
  AllowedIPs = 192.168.100.0/24, 10.200.0.0/24
  Endpoint = 10.42.0.10:51820
  PersistentKeepalive = 15
- Start WireGuard
1
2
3
4
sudo wg-quick up wg0

# To have the tunnel start automatically on Ubuntu boot
sudo systemctl enable wg-quick@wg0
- Troubleshooting
1
2
3
4
5
6
  # Down/up the tunnel
  sudo wg-quick down wg0
  sudo wg-quick up wg0

  # Force a manual handshake from Ubuntu
  sudo wg set wg0 persistent-keepalive 15
Now the Proxmox is available on https://192.168.100.2:8006
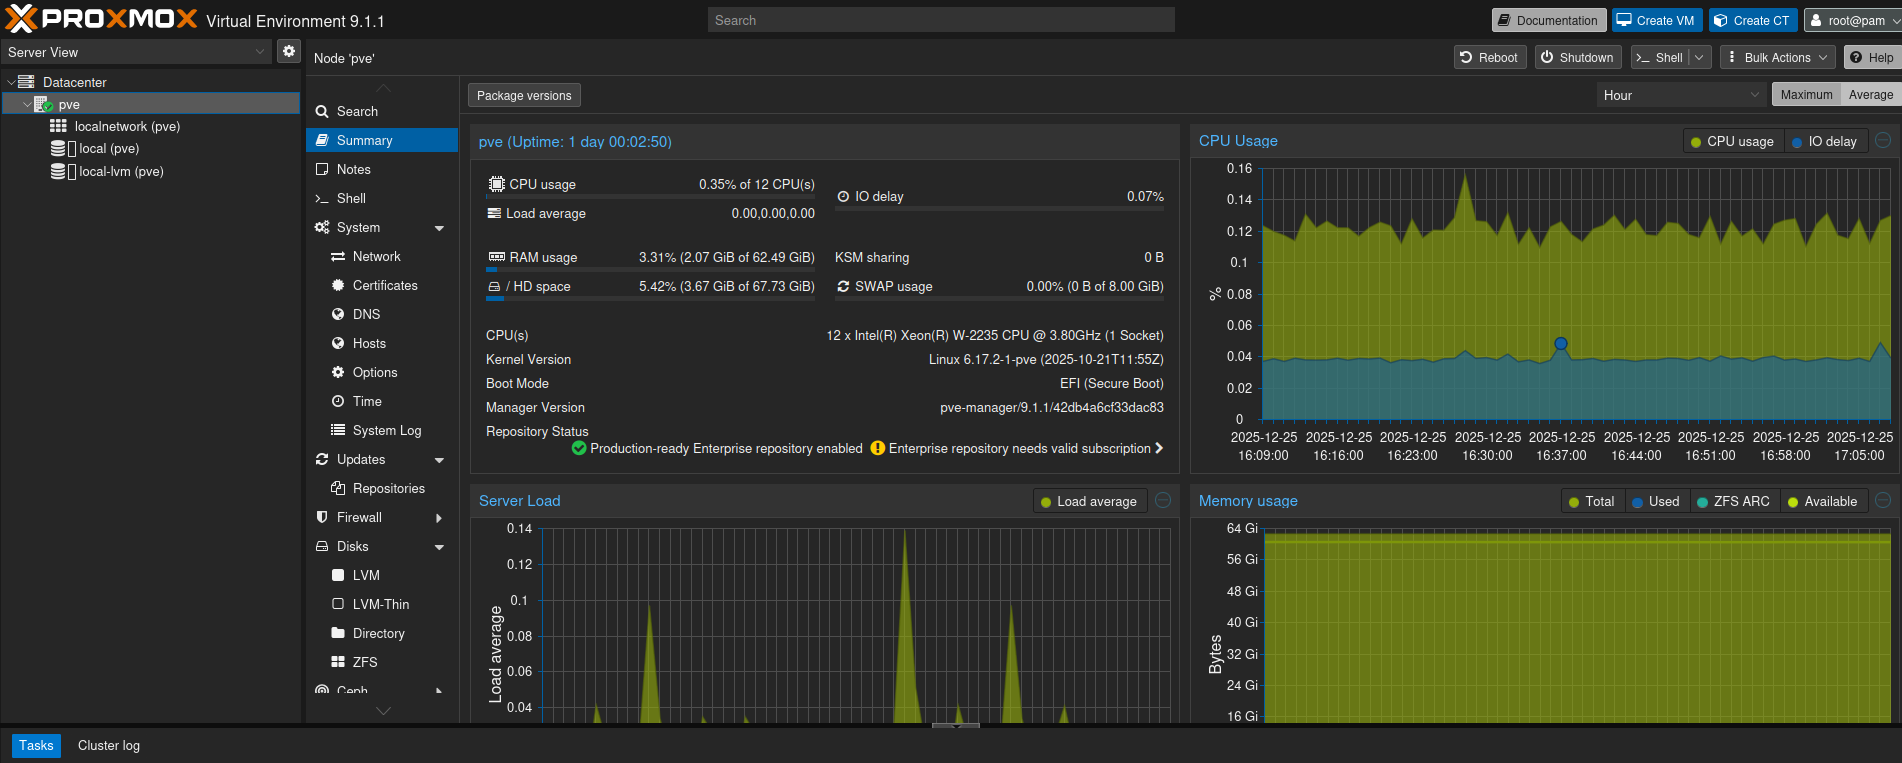
4. Proxmox VE
I want to start with one Proxmox VE. Later I plan to experiment with cluster and HA by adding another node.
Before diving into creating VM and CT, lets try to understand what Proxmox VE is.

It is based on Debian Linux and completely open source unlike its pricy cousin VMWare. It allows two types of virtualization- Kernel-based Virtual Machines (KVM) and container-based virtualization (LXC).
Lets move on with the installation of Proxmox.
1
2
3
4
5
Management Interface : nico
Hostname: pve.homelab
IP Address (CIDR): 192.168.100.2/24
Gateway : 192.168.100.1
DNS Server : 192.168.100.1
Now, lets try to SSH into our Proxmox. Since WireGuard is already running, it should be easy.
1
2
3
4
5
6
sudo wg show # Make sure tunnel is active
sudo wg-quick down wg0 # If not restart the tunnel
sudo wg-quick up wg0

ssh root@192.168.100.2 # PVE's IP address
root@pve:~#  # Bingo!!!
There is a second method as well, if WireGuard is down or if you don’t prefer it. Since my PVE is behind OPNsense router, in order to get into the web console of PVE, I will have to enable reverse SSH tunnel.
1
2
3
4
5
6
7
# On OPNsense shell (option 8)

# forward OPNsense > Proxmox SSH port 22 to Ubuntu port 2222
ssh -f -N -R 2222:192.168.100.2:22 root@10.42.0.1

# On Ubuntu
ssh -p 2222 root@localhost
Now that Proxmox is up and running and I can access it from my Ubuntu machine, I intend to use TruNAS as KVM which will allow me passthrough of storage hardware so TrueNAS sees the drive as if they were physically attached. There are two ways to do it- PCI pass through of an entire HBA/SATA controller or Individual disk passthrough.I don’t have a HBA card right now so I will probably go with the second option. Later I intend to add the HBA card to get that near bare-metal performance and reliability.