Docker: Core Concepts
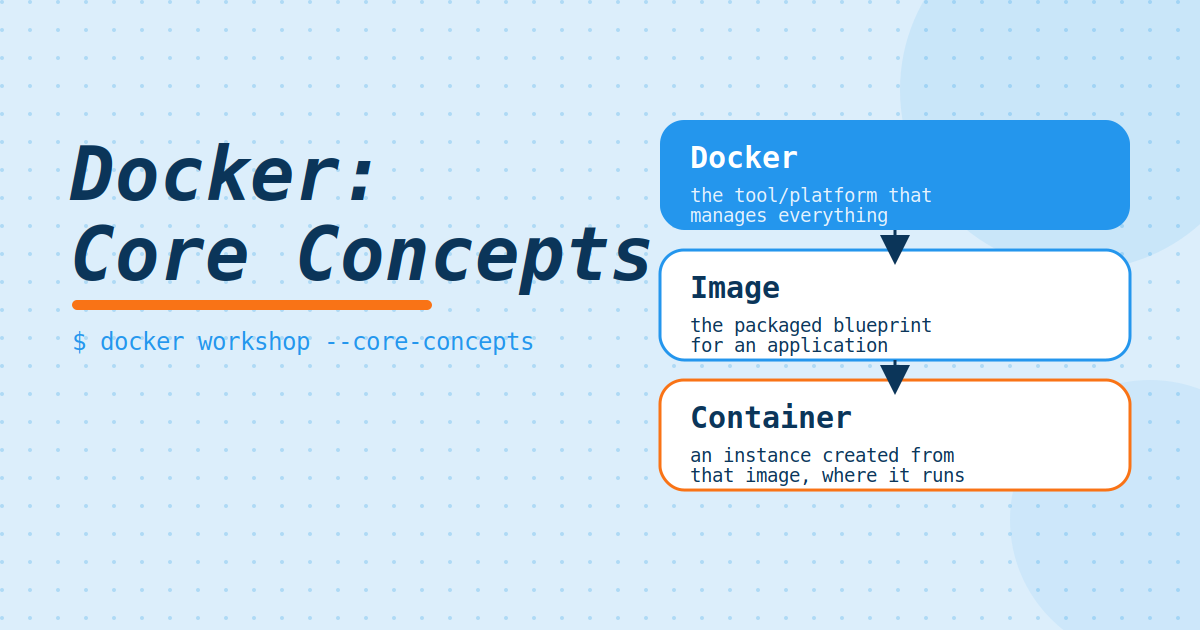
After having a good look at the top-down overview of how docker works. Let’s dive into the core concept by following the official docker workshop
- Docker: The tool/platform that manages everything
- Image: The packaged blueprint/template for an application
- Container: an instance created from that image, usually where the application actually runs
1
2
3
4
5
6
7
8
9
Dockerfile
    |
    | docker build
    v
  IMAGE
    |
    | docker run
    v
 CONTAINER
Two important principles of images
- Images are immutable. Once an image is created, it can’t be modified. You can only make a new image or add changes on top of it.
- Containers are composed of layers. Each layer represents a set of file system changes that add, remove, or modify files.
1
2
3
4
5
6
7
8
9
10
11
12
13
14
15
16
17
18
19
20
21
22
23
24
25
26
27
28
29
30
31
32
33
                IMAGE

        ┌─────────────────┐
        │ Layer 4: app.py │
        ├─────────────────┤
        │ Layer 3: Flask  │
        ├─────────────────┤
        │ Layer 2: Python │
        ├─────────────────┤
        │ Layer 1: Ubuntu │
        └─────────────────┘
                ↑
            all read-only
            all immutable


            docker run
                ↓


             CONTAINER

        ┌─────────────────┐
        │ Writable layer  │ ← container changes
        ├─────────────────┤
        │ Layer 4         │
        ├─────────────────┤
        │ Layer 3         │
        ├─────────────────┤
        │ Layer 2         │
        ├─────────────────┤
        │ Layer 1         │
        └─────────────────┘
Docker doesn’t edit an existing image. It builds new filesystem changes as layers, while containers get their own writable layer on top of the image.
Registry
An image registry is a place where Docker images are stored and distributed.
Think of it like an app store for Docker images. Docker Hub is a public registry that anyone can use and is the default registry.
Note : A registry is a centralized location that stores and manages container images, whereas a repository is a collection of related container images within a registry.
1
2
3
4
5
6
7
8
9
10
11
Docker Hub                ← Registry

nginx                     ← Repository
├── nginx:1.27
├── nginx:1.28
└── nginx:latest

redis                     ← Repository
├── redis:7
├── redis:8
└── redis:latest
Docker Compose
Dockerfile describes how to build an image and compose.yaml describes how to run one or more containers together.
1
2
3
4
5
6
7
8
9
10
11
12
13
14
Dockerfile
    |
    | docker build
    v
  IMAGE
    |
    |
    +-------------------+
                        |
                  compose.yaml
                        |
                        | docker compose up
                        v
                 CONTAINER(S)
Conceptually :
1
docker compose up -d --build
1
2
3
4
5
6
7
8
9
10
11
12
13
Dockerfile
    |
    | --build
    v
new/rebuilt image
    |
    | up
    v
container
    |
    | -d
    v
runs in background
Docker Workshop
I am following the Docker Workshop guide.
Part 1: Containerize an app
Step A. Clone the repo
1
git clone https://github.com/docker/getting-started-app.git
Step B. Creating the dockerfile
1
2
3
4
5
6
7
8
# syntax=docker/dockerfile:1

FROM node:24-alpine
WORKDIR /app
COPY . .
RUN npm install --omit=dev
CMD ["node", "src/index.js"]
EXPOSE 3000
This Dockerfile does the following:
- Uses node:24-alpine as the base image, a lightweight Linux image with Node.js pre-installed
- Sets /app as the working directory
- Copies source code into the image
- Installs the necessary dependencies
- Specifies the command to start the application
- Documents that the app listens on port 3000
1
2
3
4
5
6
7
8
9
10
Your final image
┌───────────────────────┐
│ Your application      │
├───────────────────────┤
│ npm dependencies      │
├───────────────────────┤
│ Node.js               │
├───────────────────────┤
│ Alpine Linux          │
└───────────────────────┘
Step C. Build the image
1
docker build -t getting-started .
1
2
3
4
5
6
7
docker build -t getting-started .
│      │     │        │         │
│      │     │        │         └─ build context: current directory
│      │     │        └───────── image name
│      │     └────────────────── tag/name option
│      └──────────────────────── build an image
└─────────────────────────────── Docker CLI
Step D. Start an app container
1
docker run -d -p 127.0.0.1:3000:3000 getting-started
1
2
3
4
5
6
7
8
9
docker run -d -p 127.0.0.1:3000:3000 getting-started
│      │   │  │         │    │       │
│      │   │  │         │    │       └─ image
│      │   │  │         │    └──────── container port
│      │   │  │         └───────────── host port
│      │   │  └─────────────────────── host IP
│      │   └────────────────────────── publish a port
│      └────────────────────────────── detached/background
└───────────────────────────────────── Docker
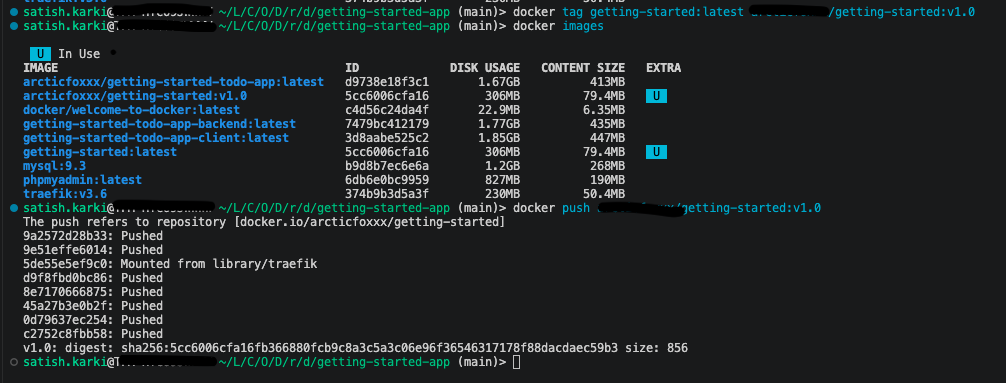
Let’s say I want to upload this image to my docker hub (repo). Here is how I will do it:
1
2
docker tag local-image:tagname new-repo:tagname
docker push new-repo:tagname
Example
1
2
docker tag getting-started:latest username/getting-started:v1.0
docker push username/getting-started:v1.0
Step E. Stop an app container
1
2
3
4
5
6
docker stop <container id> # This will stop the container only
docker rm <contianer id> # Remvoe the container

# To find the running contianers we can use
docker ps # Shows running containers
docker ps -a # Shows running and stopped containers as well
Step F. What if I remove the image file
1
2
3
docker rmi getting-started
#OR
docker image rm getting-started
One thing to note is that, the following command will not delete the remove repo
1
docker rmi username/getting-started:v1.0
If we need to pull the image again then we can use
1
docker pull username/getting-started
Here, after removing the local image and pulling it from repo, I noticed the image is name as username/getting-started:v1.0 instead of getting-started:latest. No worries, we can create a local alias.
1
docker tag username/getting-started:v1.0 getting-started:v1.0
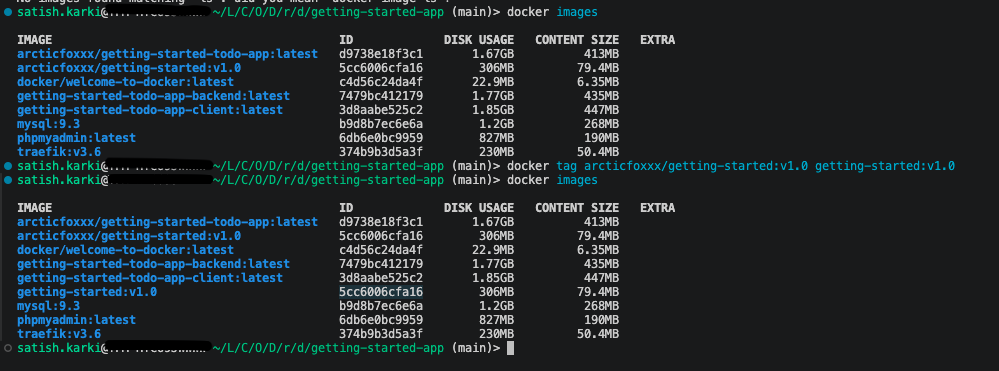
On the above screenshot, as we can see the alias points to same docker image ID.
I will stop here and let’s move on to next topic. Hopefully, I am expecting Part 2 will cover the images immutable feature and also image versioning. That would be cool. Let’s dig in.
Part 2 : Update the application
Looks like this cover the Steps E from Part 1.
Step A. Update the source code
1
2
- <p className="text-center">No items yet! Add one above!</p>
+ <p className="text-center">You have no todo items yet! Add one above!</p>
Step B. Build the updated version
1
docker run -dp 127.0.0.1:3000:3000 getting-started:v2.0
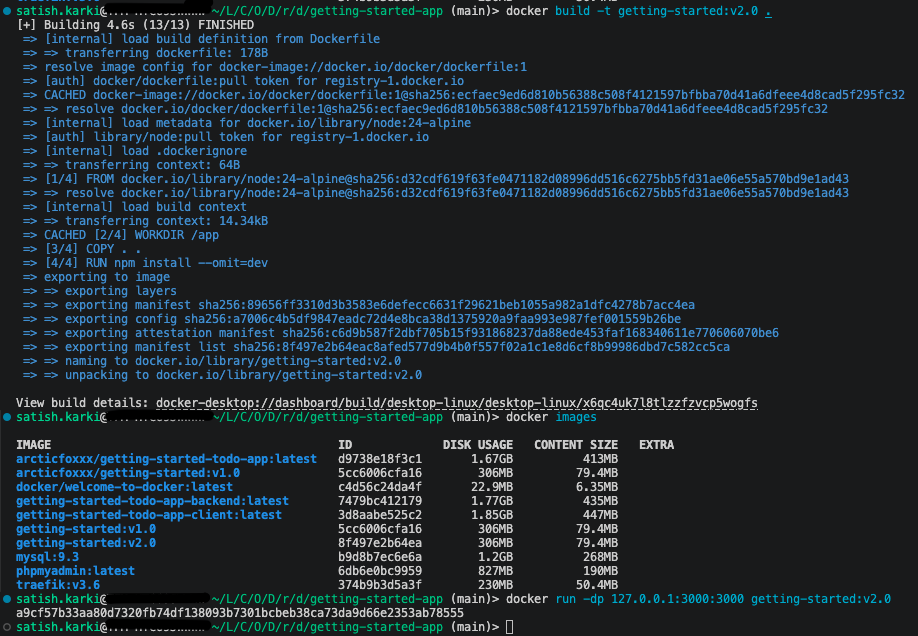
Here as you can see on the screenshot, it didn’t throw any error as I already stopped and removed the container created by image getting-started:v1.0. What if it was running? - I will be getting Bind for 127.0.0.1:3000 failed: because the old container is already using the host’s port 3000 and only one process on the machine(containers included) can listen to specific port.
Let’s try the other way around. Let’s spin on the container from v1.0 while v2.0 is still running to test the theory.
Tadaaa!!!

I am more surprised with the suggestion docker ai "help me fix this container error". Are we gonna be so dependent on AI that we eventually have to ask GPT-Hey how to wipe my ass? Where is human intelligence going collectively? Is this what singularity looks like? AI improving day by day and human intelligence degrading second by second? I guess so. Ironically, I had to ask the GPT- ` docker ai is Docker's new feature? And yes, it is docker's built-in AI assistant Gordon. Hey Gordon` I hope you don’t mind my little rant. Anyway, lets move on, getting side-tracked here.
Note: It seems the container didn’t start, but it was created. So it will be wise to use a different port if you want to run it or if not remove it.
Step C. If I want to push v2.0 to my repo
1
2
docker tag getting-started:v2.0 username/getting-started:v2.0
docker push username/getting-started:v2.0

Next we will look into sharing the application.
Part 3 : Share the application
Looks like this part covers the docker registry - Docker hub and repository.
Curiosity got the best of me. Just to recap, we already set this up in Part 1 Section D.
1
2
docker tag local-image:tagname new-repo:tagname
docker push new-repo:tagname
Here is how my docker hub repo looks like. I am getting the gist of versioning as well. 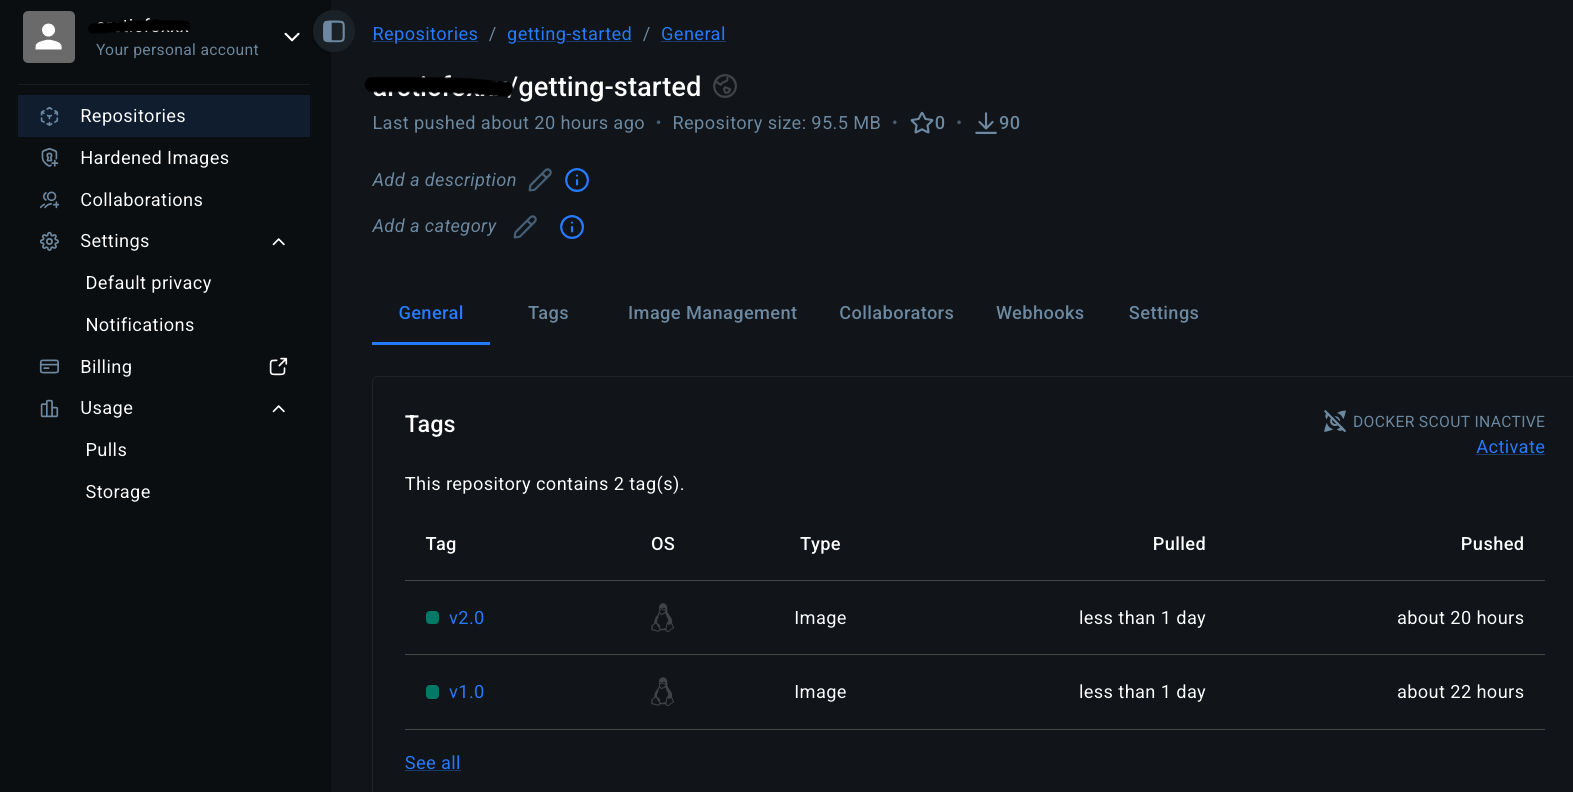
Part 4 : Persist the DB
Let’s look at container’s filesystem first. When a container runs, it uses the various layers from an image for its filesystem. Each container also gets its own “scratch space” to create/update/remove files. Any changes won’t be seen in another container, even if they’re using the same image.
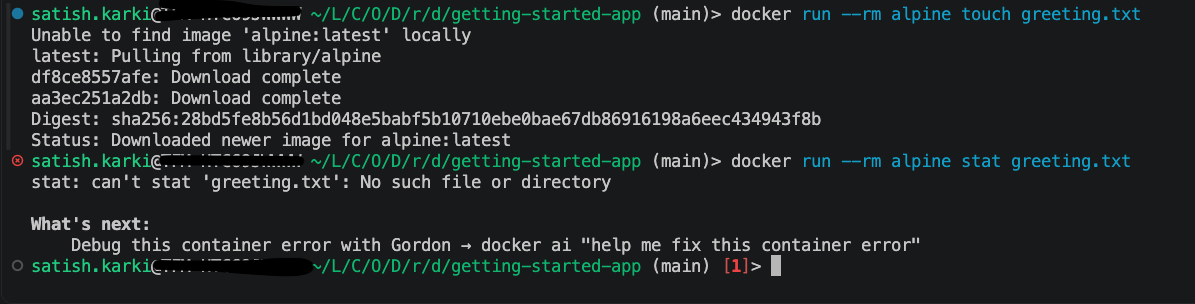
On the above screenshot, we ran a new Alpine container and created a greeting.txt file, with -rm we removed the container when file creation is finished.
1
docker run --rm alpine touch greeting.txt
Now if we try to check the stat of the greeting.txt after spinning on another container using the same image we get the error- cannot find the greeting.txt file.
1
docker run --rm alpine stat greeting.txt
Container Volume
It provides the ability to connect specific filesystem paths of the container back to the host machine. If you mount a directory in the container, changes in that directory are also seen on the host machine. If you mount that same directory across container restarts, you’d see the same files.
Step A. Create a volume and start the container
Let’s look at the commands and let’s try to understand what’s going on.
1
docker volume create todo-db
It simply creates a volume. Let’s check
1
docker volume ls

1
docker run -dp 127.0.0.1:3000:3000 --mount type=volume,src=todo-db,target=/etc/todos getting-started
Let’s break it down.
1
2
3
4
5
6
7
8
9
10
11
12
13
14
15
16
17
18
19
20
21
22
23
24
docker run
│
├── -d
│     run in the background
│
├── -p 127.0.0.1:3000:3000
│     connect your computer's port 3000
│     to the container's port 3000
│
├── --mount
│     attach some storage
│
│   ├── type=volume
│   │     use a Docker volume
│   │
│   ├── src=todo-db
│   │     use the volume named "todo-db"
│   │
│   └── target=/etc/todos
│         make that volume available here
│         inside the container
│
└── getting-started
      image used to create the container
I am more interested in target /etc/todos. Why this path? The answer is in source code.
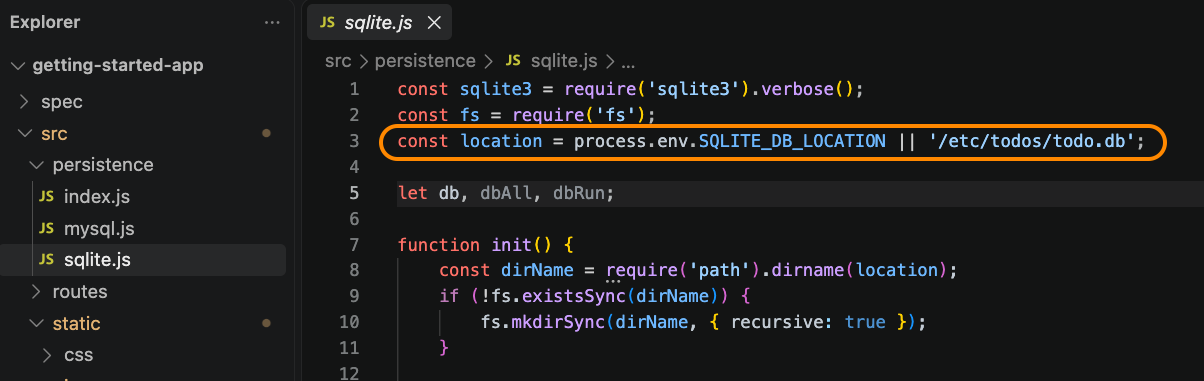
Look at the highlighted line of code - up until now, container would get its own “scratch space” to create/update/remove files - which in this case is /etc/todos/todo.db and once container is stopped and remove, it would go away.
Now with volume, here is what’s happening:
1
2
3
4
5
6
7
8
Container                         Volume: todo-db
┌────────────────────────┐       ┌─────────────────────┐
│                        │       │                     │
│ /etc/todos ─────────────────►  │ todo.db             │
│      │                 │       │                     │
│      └── todo.db       │       └─────────────────────┘
│                        │
└────────────────────────┘
Step B. Verify the data persist
- Add items to the todo list app http://127.0.0.1:3000/
- Remvoe the container
1
  docker rm -f <id>
- Start a new container
1
  docker run -dp 127.0.0.1:3000:3000 --mount type=volume,src=todo-db,target=/etc/todos getting-started
- Yes, my todo list is still there.
Step C. Dive into the volume
Where is Docker storing my data when I use a volume?
1
docker volume inspect todo-db
Output
1
2
3
4
5
6
7
8
9
10
11
[
    {
        "CreatedAt": "2026-08-25T19:43:52Z",
        "Driver": "local",
        "Labels": null,
        "Mountpoint": "/var/lib/docker/volumes/todo-db/_data",
        "Name": "todo-db",
        "Options": null,
        "Scope": "local"
    }
]
The Mountpoint is the actual location of the data on the disk.
1
2
3
4
5
6
7
Container sees:                 Docker stores:

/etc/todos                     /var/lib/docker/volumes/
       │                        todo-db/_data
       │                              ▲
       └──────────────────────────────┘
             mounted volume
To see mount point only:
1
docker volume inspect --format '' todo-db